Friday, September 30, 2011

First Wall Ready for the Crane

83 degrees with good weather.  High mosquito count - 3 per cubic yard.

(really Thursday evening)

I framed the floor joists and cut and nailed the 3/4 inch plywood flooring to the "lean to" sill plate.  The rim joist was nailed very well to the rim joist of the main structure to tie them together.


Lean to flooring is complete.
Then, I cut the top and bottom plates for the far wall at 14 feet and began cutting the 8 foot studs to length and laying them out between the plates.  Once square I covered the studs with a house wrap.  I know that I may hear from some of you about this but putting the house wrap under the sheathing appears to be the best way to go.  I did much research on house wrap and vapor barriers and the consensus is that house wrap is not a vapor barrier but does prevent water infiltration.  It should go under the exterior material (i.e. siding) but obviously should not be the final finished surface.  Water vapor actual passes through the house wrap and allows the house to breath.  Later I will add insulation and put the paper vapor barrier toward the inside wall.

Far wall in Sketchup.
House wrap ready to roll out.
Stapling the wrap down to the studs.
Easy?  I guess.
After the wrap was down I installed the sheathing and glued the edges with Liquid Nails and used hot dipped galvanized nails in the framing nail gun.  This first wall is ready to go up if I get get help lifting it in the morning.  I estimate that it weighs about 250 pounds, which should take about three people to safely put it in place.  I may even put a coat of primer / sealer on the exterior surface while the wall is still down in the morning as this is supposed to dry very quickly.  More later.

Ready, lift!!!


Saturday, September 24, 2011

Vapor Barrier and Floor Installed

72 degrees with rain and the mosquitoes are back.  About 1.25 mosquitoes per cubic yard.

I anticipated a break in the weather and got to work on the project at around eight in the morning.  I started by removing the sill plates and laying down the vapor barrier and sill plate gasket (pink).  Then I reinstalled the sill plates and secured them tightly with the bolts.


Sill plate gasket goes over the vapor barrier.
I measured the diagonal dimensions again to ensure that the sill was square (193 1/2" across) and then cut and nailed down the rim joists to the sill plate.  In addition to the rim joists there are another 10 joists added every sixteen inches on center to give the floor support.  These are eight inch cypress boards so it should be very strong and I started the first one from the edge of the rim joists at 15 1/4 inches to allow the joists to align between the edges of the plywood when installed.  If I did not do this then the plywood would overhand the joists at the seam, which would not provide adequate support.  I also used a sub floor glue to prevent floor squeaks and the girls helped by cleaning up the excess that squeezed out along the edges.

Sketchup drawing of the first floor joists.
Rim joists nailed down and square.
Ten additional joists at sixteen inches on center adds strength.
Spreading the sub floor glue.
Helpers come in all sizes.

Nailing every six inches.
 

Well, that is about all for today.  The rain started to really come down at around noon and so we spread a tarp over the new floor and brought all of the tools back into the garage.  I'm looking forward to the day when the first floor will be up and I can keep all of the tools close by.

Friday, September 23, 2011

Google Imaging Pointed Playhouse

81 degrees and rain all day.

Well, on my way to work this morning I caught Google trying to capture a glimpse of the Pointed Playhouse.  I ran after them down the street and to a school where they were obviously afraid of me capturing them on video with my iPhone, capturing me with their Street View cameras.

I think we are even now...

More work on the ground floor hopefully tomorrow if I have a break in the weather.

Thursday, September 22, 2011

Sill Plate Fitted

83 degrees with wet rain.  Currently under a flash flood watch.  No mosquitoes in the area.

I worked all day and thought that I had a few hours of sun light to work outside but the time was cut short as dark clouds in the areas started to produce rain.  I was using my old Ridged cordless drill and circular saw to cut the sill boards to length and to drill the holes for the bolts that will hold them in place.

Sill plate installed - looking from the dining room while raining.
I will need to remove the sill plate and install the vapor barrier, which is a 6mm plastic sheet that will go over the concrete block foundation and cover the interior of the crawl space.  Then I need to install the sill plate gasket and bolt the wood sill back down.  I'll wait for a dry day to get this done and don't expect that it will take more than an hour to complete.

Tuesday, September 20, 2011

Drying Time

77 degrees with a few dark clouds - no rain yet.  Mosquito count = 1 per cubic yard.

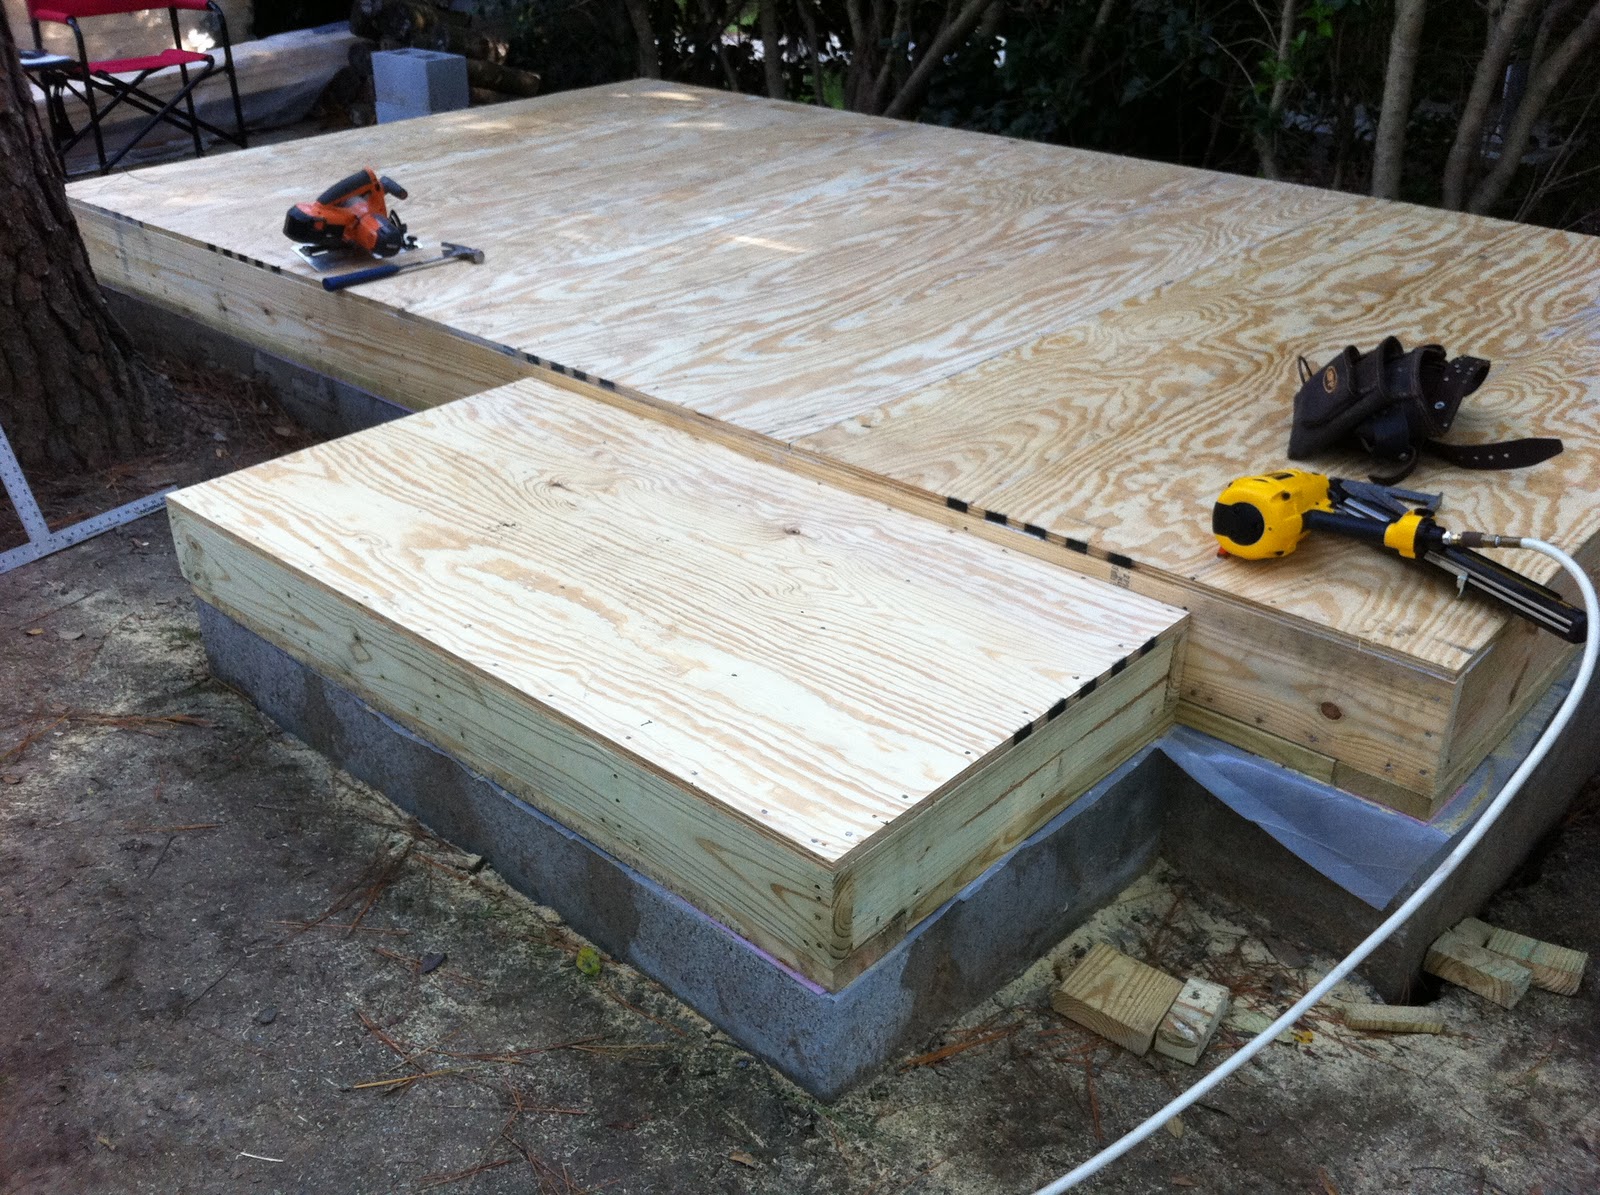
Today I woke at around 5:00 AM and slowly started to plan my day.  I called the office and told them that I was going to work an adjusted schedule today and took in some coffee, got dressed and went off to the home center to pick up the four bags of concrete and the eight foot pressure treated 2x6 that I promised myself.

I then got back to the house and took the wood forms off of the foundation around the tree and broke up some of the extra block that I had and filled some of the voids that were very deep with the small pieces.  I mixed the concrete and poured it into all of the areas that I thought are more critical and set the "J" bolts close to the corners that will later hold the sill plate.  All done with the foundation!!!


Critical voids filled with concrete.
I know - not very exciting and I know that I have too many pictures of concrete block here.  Things should move along more quickly now and I'm very happy to be able to work mostly with wood from here on out.

Oh - I recently read this news article where Roald Dahl's "hut" is in need of some care and his wealthy family will not pay the 500,000 pounds to have it moved (news).

Dahl's hut.
I thought that everyone in England has or wants to have a hut.  Fairly common I thought.  I can't understand why it will cost over 250 times the cost to build the Pointed Playhouse to simply move Dahl's hut.  Maybe it will become the new ticket office for the London Eye.